Home
TMainMenu
by Tracey Sandbrook
| Here is a basic
tutorial on how
to use a TMainMenu. |
-
Adding Menu Items
-
Inserting Menu Items
-
Deleting Menu Items
-
Creating a SubMenu
-
Menu Templates
-
Rearranging Menu Items
-
Creating an OnClick event for a
MenuItem
-
Switching Between Two Menus
-
Splitting Your Menu
-
Setting Which Menu Is Used On A
Form
-
Checking and Unchecking Menu
Items
-
The RadioItem Property
-
Why Do Some Menu Items Have
'...' After
Their Captions?
-
Using The Default Property
-
Assigning Short-cut Keys
-
Enabling and Disabling MenuItems
-
Visible and Invisible MenuItems
Adding Menu Items
To add MenuItems you must use the
Menu Designer.
The Menu Designer can be opened in
two ways. The easiest way is to double-click on the TMainMenu component
on your form. The second way is to double-click on the column to the
right
of the Items property in the Object Inspector, or click on the ellipses
(...) button you will find in that column.
The first time you open the Menu
Designer,
you will see a blank item in the top left-hand corner of the form.
Select
this blank item, by clicking on it. Now you can edit that items Caption
property. This will appear as the text in the Item. Press Enter.
Inserting Menu Items
To insert a menu item you can choose
'Insert' from the pop-up menu (this is the menu that appears when you
right-click
in the menu designer), or you can press the 'Insert' button on your
keyboard.
Deleting Menu Items
This can be done using similar
actions
to those for inserting an item. First you will need to click on a menu
item so that it is selected. Now, either click on the 'Delete' option
in
the pop-up menu or press the 'Delete' key on your keyboard.
Creating a SubMenu
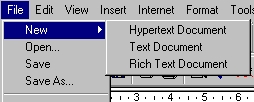
In the image above, the
SubMenu is the part of the menu that lists 'Hypertext Document', 'Text
Document', and 'Rich Text Document'.
SubMenus have a couple of uses,
including
that SubMenu's can be used where adding a Dialog would usually be
necessary,
but SubMenu's will simplify the job. This is the case in the image
above.
Here, I want to give the users of my program the option to create three
different types of documents. If I want to give them that option, they
have to have some way of choosing the option that they want. One way to
do this would be to load a dialog when they click on 'New...'. This
dialog
would have to have a ComboBox, ListBox, RadioGroup or some other
component
to list the options. Also an OK or Cancel button, maybe a Label, maybe
a background image...but whatever, it is much simpler to use a Submenu.
Though, of course, this may not always be the best option.
Anyhow, these are the steps to
follow
to create a SubMenu.
Right-click on the item that you
wish
to extend and choose the 'Create Submenu' option. The short-cut keys
for
this action are Ctrl + Right Arrow Key.
You can also create Submenus off
Submenus.
Menu Templates
Menu Templates make reusing
often-used
menu drop-down lists easy.
Borland has given us some examples
that we can use.
To see these, we can insert them by
right-clicking and choosing 'Insert from Template'.
Next we choose the template we wish
to insert and click OK.
You must make sure that you insert
these templates in the right place. To place these templates make sure
a blank item at the top of the menu is selected when you right-click
and
insert a template.
If you wish to put the template in
a drop-down list from your menu then select the item you wish to insert
the template above, and then right-click. The template will be created
as a submenu.
If, for some reason, you reuse
certain
drop-down lists through-out more than one of your applications or
menus,
you can save it as a template to save yourself from having to re-type
and
organize it.
Right-click on the piece of the menu
that the drop-down list appears from. In the image shown for creating a
submenu, if I wanted to make the 'New' submenu into a template I would
right-click on 'New'. If I wanted to save that entire drop-down list I
would right-click on 'File'. Once the pop-up menu appears, choose 'Save
As Template'.
The Save Template dialog will
appear.
Type the text you want your template to be named.
To delete a template, right-click
anywhere in the Menu Designer, and choose 'Delete Template'.
Select the template you wish to
remove
and click OK. Make sure you have the correct template selected because
there is no prompt.
Rearranging Menu Items
The easiest way to rearrange menu
items is to drag and drop the items where you want them. Items can even
be dragged from one drop-down list to another, or as new titles for
drop
down lists.
Creating an OnClick event for a
MenuItem
All you have to do is double-click
on the item you wish to have an OnClick event. Or you can click
on
the item and go to the Events page of the Object Inspector and
double-click
in the right column for the OnClick event listing.
OnClick events can also be added
when
the Menu Designer is not open, and you are browsing the menu on your
form.
Click on an item and the Code Editor will appear.
Switching Between Two Menus
When you have more than one menu on
your form, you can easily switch between them without having to return
to your form.
You can switch menus by
right-clicking
and choosing 'Select Menu'. Now you are able to choose from a list of
the
MainMenu components on the current form.
Splitting Your Menu
Most drop-down menu's have more than
one type of item. For example, lets look at the File drop down list in
Microsoft WordPad. The first group contains four options for working
with
your documents, the second group contains printing options, next is a
list
of the four most recently opened documents, and last is Exit.
Splitter bars have been used to make
it less confusing to use the options.
You are almost sure to want to do
this yourself some time when you are working with menus.
They can be added by setting the
Caption
of a MenuItem to '-'.
That will create a horizontal line.
Vertical lines can also be set.
There is more than one
way to split your menu's. A horizontal line can be used, and is the
most
used option. Menus can also be split into more than one column, with or
without a bar to split them.
To split a menu into more than one
column with a bar, set the Break property to mbBarBreak. You set the
Break
property for the MenuItem that you wish to be at the top of the new
column.
To split a menu into more than one
column without a bar, set the Break property to mbBreak. For this
setting
also, you set the Break property for the MenuItem that you wish to be
at
the top of the new column.
Setting Which Menu Is Used On A
Form
To set this option use the forms
Menu
property. The drop-down list in the right-column for this property in
the
Object Inspector will list the Menus available. You can choose from
menus
on the current form, or menus that aren't being used by another form in
your project.
The code to do this is:
procedure
TForm1.Button1Click(Sender:
TObject);
begin
Form1.Menu :=
MainMenu2;
end;
Checking and Unchecking Menu Items
In some situations you will want to
check or uncheck menu items to show that something is on or off,
visible
or invisible, etc.
The example below shows how this can
be done:
Add a MenuItem with a Caption of
'Speed
Panel' to your MainMenu. It should be automatically named 'SpeedPanel1'
for you by Delphi.
Set SpeedPanel1's Checked property
to True.
Add a TPanel component to your form
(Panel1).
Put the following code in the
OnClick
event for SpeedPanel1, that is, your MenuItem:
procedure
TForm1.SpeedPanel1Click(Sender:
TObject);
begin
SpeedPanel1.Checked
:= not SpeedPanel1.Checked;
Panel1.Visible :=
not Panel1.Visible;
end;
Now run your project and click on
your MenuItem a couple of times.
The RadioItem Property
This Checked option is much the same
as the RadioItem option. Where the Checked option will put a tick to
the
left of your MenuItem, the RadioItem property will put a black circle,
much like a bullet, to the left of the MenuItem.
The RadioItem property works like
a TRadioGroup component, where only one item can be selected at once.
Each
menu drop-down or submenu can have one set of RadioItems.
Here is an example on how to use
this
property:
Drop a MainMenu component onto your
form and double-click on it to open the Menu Designer.
Set the first MenuItem to have a
Caption
of 'Form Color'. In the drop-down list coming off FormColor1 (the
MenuItem
that you just created) create three more MenuItems:
BtnFace
Blue
Yellow
Set BtnFace1's Checked property to
True.
Select all three of these MenuItems
at once. This can be done by clicking on 'BtnFace', holding your Shift
key down, and clicking on 'Yellow'.
Set the RadioItem property for these
three MenuItems to True.
Insert this code for the correct
MenuItems:
procedure
TForm1.BtnFace1Click(Sender:
TObject);
begin
Form1.Color :=
clBtnFace;
BtnFace1.Checked
:= True;
end;
procedure TForm1.Blue1Click(Sender:
TObject);
begin
Form1.Color :=
clBlue;
Blue1.Checked :=
True;
end;
procedure
TForm1.Yellow1Click(Sender:
TObject);
begin
Form1.Color :=
clYellow;
Yellow1.Checked
:= True;
end;
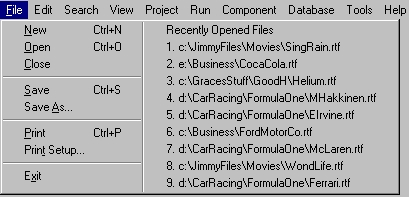
Why Do Some Menu Items Have '...'
After Their Captions?
This means that a dialog will appear
after you click on this item. For example, in Delphi New and Open have
'...' after them. This means that the New and Open dialog's will appear
when you click on them. New Application and New Form don't have these,
as a dialog does not appear after you click on them, but a New
Application
or Form will.
Using The Default Property
This is an interesting option which
I believe would be a great time saver, especially for those large menus
with many items.
When the Default property is set to
True for a MenuItem, that MenuItem will be executed when the user
double-clicks
on the parent item.
For example, look at the image below:
When you double-click on 'File'
the 'Open' item will be executed. This saves your users having to
browse
through the menu.
Each sub-menu is allowed one Default item.
The Default item will be in Bold, as in the image above, where 'Open'
is
Bold.
Assigning Short-cut Keys and Creating
Hot Keys
This means that when certain key
combinations
are pressed, the MenuItem using those keys will be activated.
Again we will look at the image above.
Notice that New has 'Ctrl + N' next to it, Open has 'Ctrl + O'. This
means
that when Ctrl + N is pressed, the OnClick event for New will be
executed,
and when Ctrl + O is pressed, the OnClick event for Open will be
executed.
To set these shortcuts:
Click on the MenuItem you wish to assign
a shortcut to, then select a key combination from the ShortCut property
drop-down list.
Hot Keys can also be added. This is done
by typing an ampersand (&) before the letter we want to be the hot
key.
Look at Delphi, for example. To execute
New Application by hot-keys, we must press
Alt + F to open the File menu, then T
to execute the New Application item.
No two hot keys can be the same within
a submenu, but the hot key can be used in another submenu as well.
For example, to have a MenuItem that said
'File', we would type '&File' in the Caption.
For 'New Application' we would type New
&Applica&tion'.
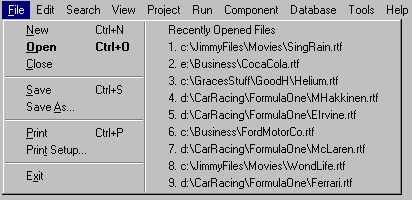
Selecting Multiple MenuItems
Selecting multiple MenuItems is rather
simple.
In the example above we clicked on the
first item that we wanted to select, held down the Shift key and then
clicked
on the last item we wanted to select, thus selecting everything between
these two items.
You can also hold Ctrl and click on any
item you want to select.
If you have a long list of items you wish
to select, minus one or two in the middle, it may be the simplest
option
for you to select all the items (using the first method above with
Shift)
and then hold Ctrl and click on those you wish to deselect.
These selected items can then be dragged,
deleted, have properties edited, etc.
Enabling and Disabling MenuItems
Any MenuItem with text in it can be
disabled
or enabled. This can be done by setting the Enabled property to True or
False.
This can be done with code like this:
procedure TForm1.Button1Click(Sender:
TObject);
begin
MyMenuItem1.Enabled
:= False;
end;
If a MenuItem is made Enabled, Disabled,
Invisible or Visible and it has a sub-menu, the sub-menu will be
affected
by it. For example, if the main MenuItem is Disabled, the sub-menu will
not appear, naturally this is the same if the MenuItem is invisible.
Visible and Invisible MenuItems
Just like Enabling and Disabling
MenuItems,
any MenuItem can be made Invisible or Visible. This can be done using
the
Visible property.
The code to do this is:
procedure TForm1.Button1Click(Sender:
TObject);
begin
MyMenuItem1.Visible
:= False;
end;
Home
Copyright © 1998-2002 James M
Sandbrook
& Sandbrook Software. All rights reserved.
Do not duplicate or redistribute in any
form.