![]()
The
Delphi Integrated
Development
Environment (IDE)
by
James M Sandbrook of Tokoroa, New Zealand. jamesmsandbrook@gmail.com
The Borland Delphi IDE was designed
(organized)
to help you develop your projects with speed and the good folk at
Borland
(Inprise) have gone to great lengths to give you a programming
environment
that is very efficient.
The IDE makes it easy for you to create
your own programs with ease, it does take a little time for a beginner
to get to know how to use the Delphi IDE but the effort is worth it. We
have included these Delphi IDE web pages to help the beginner get to
know
how to use the IDE which will help them learn how to program with
Delphi
in the long run.
Note: Some of the items mentioned
below will only work on some versions of Delphi.
This web page will be updated often as
we add more helpful information about Borland Delphi's IDE.
Delphi IDE Menu Items:
First lets have a look at the Delphi
IDE
menu items, we will give you a brief run-down of the Delphi menu items
and what they are for, you may want to print these out and hang them on
a wall close to your computer, this will save you having to open the
help
files to find out what they are used for. They are listed on different
web pages so you can print them separately.
![]()
The Window menu now shows a list of all the open windows this is the same as pressing the Alt + 0 keys.
Below we cover many things that you will find in the Delphi IDE.
Saving Your Delphi Desktop Settings:
From Delphi 5 upwards you can now save
the the Desktop Settings. This is very easy to do.
Most developers need to use one set of
windows at design time and a different set at debug time and with this
new feature you can do just that by arranging the Delphi IDE and
docking
windows the way you want them for both and then go to View|DeskTops in
the menu and then click on Save Desktop.
You can also delete and load another
desktop
from View|Desktops as well as Set the Debug Desktop.
| You will find many components on
each
page of the Component Palette, you can easily see the components icons
and if you leave the mouse cursor over a component you will be able to
read its hint which will be its name.
It is simple to add a component
to your
forms, just click on the component and then click on the form where you
want the component to be.
You can Shift-Click on a component to add many copies of that component to a form, in other words hold down the Shift key and then click on a component, a blue frame can be seen around the selected component on the Component Palette. Next just click on the form where you want the component/s to be. To stop doing this you click on the arrow on the left of the Component Palette. If you have many components and it takes a while to find one or you find it takes to much time scrolling through the Component Palette then you may want to consider shortening the names of the tabs on your Component Palette. An example is that you can use Sys instead of System or Data C, instead of Data Controls etc. Component Palette Context Menu - Tabs:
You can now right-click (Component
Palette
context menu) on the
Component Palette and go to the menu item Tabs
and you will see a list of the Component Palette pages. You can
click on any page you want to see.
|
The To-Do List:
With Delphi 5
Borland
introduced an interesting new feature called the To-Do List.
This is a collection
of notes (tasks) that you need to do to finish the current project that
you are working on.
Go to View|To-Do List in the menu.
If more than one programmer is working on a project then the To-Do List can be very helpful.
Object Inspector:
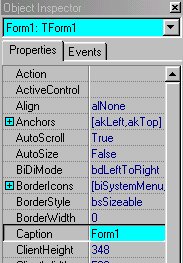
Now lets move on to the Object
Inspector
which is used to change a component or forms property values while you
are designing a project.
The Object Inspector in Delphi 6 is
located
below the Object TreeView.
The Object Selector (instance list) is
at the top of the Object Inspector and it is used to indicate the
current
component and its data type in the Object Inspector.
When you click on the Object Selector
a drop-down list appears, you can use the scroll bar to find the
component
or form that you want or you can just start typing the component or
forms
name until the one you want is found.
In Delphi 6 you can now see the class
name
for each object in the list.
When you select a components name in the
Object Inspector in Delphi 6 you can now see a tool tip (Hint) for that
component, this is a useful feature that helps greatly if the
components
name is so long that in older versions of Delphi you couldn't see it
all.
You can hide the Object Selector in Delphi 6 by unchecking 'Show Instance List' in the new Object Inspector properties.
The left hand side of the Object
Inspector
lists the components properties, the right hand side is for changing
values
to a property. Some are Boolean, in other words True or False, to
change
one of these from one value to another just double-click on it.
Sometimes
you may see an ellipsis button, like the Font property for a form, you
can click on this and the Font dialog box will appear for you to make
you
changes to the forms fonts, styles etc.
Experiment with these, it will not take
you long to learn all the mysteries of the Object Inspector.
Should you ever need help while you are using the Object Inspector while using a property or event just press the F1 key.
If you right-click on the Object
Inspector
you will see a popup menu with many options for you to choose like:
Stay On Top, Dockable and Show All.
When you click in the Object Inspector
you can use the Tab key to move between the Properties column and the
Values column.
If the Property item has a '+' sign then
you can expand it by using the Right Arrow key.
When the '-' is shown you can use the
Left Arrow key to close it again. (You can also use the Up & Down
arrow
keys to move up and down.)
When you have tabbed to the Property
column
you can type a letter and the text cursor will jump to the property
that
starts with that letter.
Example: If you type a 'c' then it may
jump to the Caption property in the Object Inspector.
You can then type the rest of the word
and the text cursor will go to it or just tab to the Value column to
make
a change to the Caption property.
If you keep typing more letters then the
cursor will jump to the property that you are spelling, in other words
you are doing an incremental search in the properties column in the
Object
Inspector.
With the release of Delphi 5 you can now arrange the contents by alphabetically or by category, just right-click in the Object Inspector and then move the mouse cursor to the word Arrange, you will then see the new options.
Object Inspector Properties:
You can right-click on the Object Inspector and select Properties from the menu or go to Tools|Environment Options and click on the Object Inspector tab.
You can now:
Customize the colors of the Object
Inspector.
Change the Speed Settings to suit your
needs.
Display or hide the new instance list,
class names in the instance list, the Object Inspector status bar, the
background grid, and read-only properties.
The properties of component references
can be expanded inline and displayed on both the properties and events
pages.
A new feature (Delphi 6) is that you can use the Object Inspector to select another component when another components properties are shown in Object Inspector.
Example:
Start a new project.
Add a Tutton to the for (Form1).
Click on Form1 then go to the Object
Inspector
and change the ActiveControl property for the form to Button1.
Next hold down the Ctrl key and then
double-click
in the ActiveControl value which is in this case Button1.
You should now see that Button1 is selected on Form1.
If you add a TToolBar component to Form1 and then add a TImageList (ImageList1) and then change the ToolBar1 Images property to ImagList1 you can do the same etc.
Another very helpful time saving
feature
you will find in Delphi 6 is if you add a TMainMenu component to a form
and then you set the forms Menu property to MainMenu1 you will notice
that
a + sign appears to the left in the Menu property, if you click on the
+ sign the tree will expand to show you the properties of MainMenu1.
This is very helpful and it means you
do not have to click on the MainMenu component to set its properties.
Also you will also notice that some of
these properties are in a different color which is also helpful.
And if you add a ImageList you can
'connect'
it to MainMenu1 using the Image property with the same result.
Docking Support:
The Delphi 4, Delphi5 and Delphi 6 IDE
has docking support.
If you don't want an IDE window to dock
you can right-click on the window and then uncheck the dockable menu
item.
To turn off docking support
temporarily,
hold down the Ctrl key while dragging the dockable window.
While the Ctrl key is pressed the dockable
window will not dock.
In Tools|Environment Options|Preferences
you can turn off docking.
Alignment Palette:
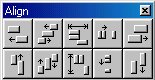
The Alignment Palette is very useful
for
aligning the components on a form, place the mouse over the buttons so
the hints show they will give you an idea about what the button is for.
You can disable the Alignment Palette
hints, by right-clicking on the Alignment Palette and clicking on Show
Hints, if the tick is on Show Hints then you will be able to see the
hint
for each button on the Alignment Palette.
You can also make the Alignment Palette,
'Stay On Top', by right-clicking on the Alignment Palette and
then
click on Stay On Top.
Project Manager:
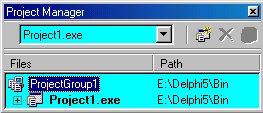
When using the Project Manager in
Delphi
4 and Delphi 5, you can have small or large Project Manager ToolBar
buttons.
To change the size of the buttons you
drag the bottom of the Project Managers ToolBar, up for small buttons
and
down for large buttons.
Project Options:
The Project Options dialog box is to
specify
options for compiler, form, application, and linker (Manages how your
program
files are linked) for your project, and also to manage your projects
directories.
The Default check box will save the
current
settings as the default for each new project.
If you open the Project Options dialog box when no project is currently opened in the Delphi IDE, any changes you make in the Project Options dialog box is applied to all new projects, these changes will become the defaults.
If you open the Project Options dialog
box when a project is open in the Delphi IDE then the changes you make
will be applied only to the opened project.
Unless of course you click on the
'Default'
check box which is to the bottom left of the Project Options dialog box.
IDE command-line options:
Some Delphi 5 command line options:
You can use -ns to stop the Delphi splash screen showing at Delphi's startup like this:
E:\Delphi5\Bin\delphi32.exe -ns
you can also do it this way:
E:\Delphi5\Bin\delphi32.exe /ns
Though it doesn't appear to make much difference in speeding up the startup of Delphi.
And here is another example:
E:\Delphi5\Bin\delphi32.exe /ns /hm /hv
And here is a screen shot of the IDE Title Bar:
![]()
Components List:
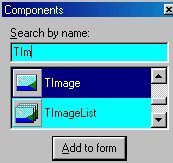
You may also find the Component List
helpful.
You will find it under 'View' in the Delphi Menu.
You can type in the name of the component
in the edit box at the top of the Component List and this will start an
incremental search through your components until you find the one you
want.
Next double-click on the component name in the list to add that component to the form or click on the Add To Form button to do the same thing.
Watch List Window:
You can use the Watch to view
variables.
You type in the name of the variable you want to view, then you can
step
through the code to see the variables value change.
This is a great way to see what is
happening.
You will find Watch in the 'View' drop-down menu, click on "Watches".
You can also make the Watch List Window,
'Stay On Top', by right-clicking on the Watch List Window and then
click
on Stay On Top.
OpenHelp:
This is the oh.exe which should be
found
in your Delphi/Bin directory and it is a tool you can use to manage the
structure of Delphi ’s own Help files,integrating third-party files
into
the help system.
You can find in by going to Help|Customize
in the IDE menu.
Problems With The Delphi IDE:
Borland states that there is a problem
with the Delphi 5 IDE disappearing, the answer they suggest is to
delete
the desktop preference files, or '.dsk' files. After you do this Delphi
will dynamically generate these files as it needs them, but you will
lose
any environment settings that you had set previously.
